Has your Builder Given You the Option to Prewire for a Security System?
Read the Guide Below to Find Out How to Get the Most Out of Pre-Wiring Your New Home.
CCTV
1. Choose the Location for Your NVR/DVR.
Generally this will be in a study, a storage cupboard or sometimes in an entertainment unit under your TV. When choosing a location for your recorder you should consider:
- You will need internet access at this location If you want to view your cameras remotely. This can be added with additional cabling but there will be an additional cost to this.
- You will need to have a power point installed at this location. (CCTV runs ‘Power-over-ethernet’. This means that each camera is cabled directly into the recorder, as this is how they both receive their power and transfer their data to the recorder. )
- It is preferable have access to a computer monitor or TV at this location so you view the cameras and access your NVR locally (at the device)
- Internet Access
- Power Point
- Access to Computer Monitor or TV
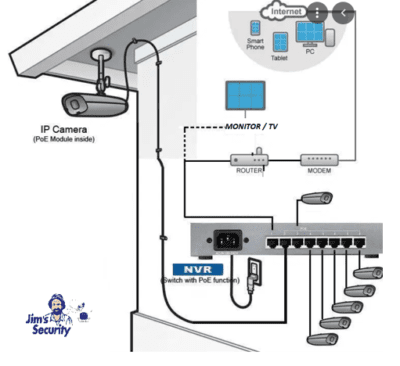
CCTV Wiring Diagram
2. Choose the Location for Your Cameras
Factors to consider include:
- Before pre-wiring you should decide on how many cameras you will need – average rectangular shaped homes generally require 4-6 cameras. While larger or odd shaped homes usually need more
- It is better to locate cameras on the ground floor (out of reach) as you will achieve a better field of vision. Locating cameras on a second story eave is not ideal as they will be point straight down and have a reduced field of vision
- Do not locate cameras close to trees or other items that will cause IR to reflect at night
- Locate cameras on the corners of buildings to give a greater field of view. standard CCTV cameras have a 2.8mm lens which give an approximately 90 degree field of view (see below).
- Before pre-wiring you should decide on how many cameras you will need – average rectangular shaped homes generally require 4-6 cameras. While larger or odd shaped homes usually need more
- Number of Cameras
- Where to Fit Cameras
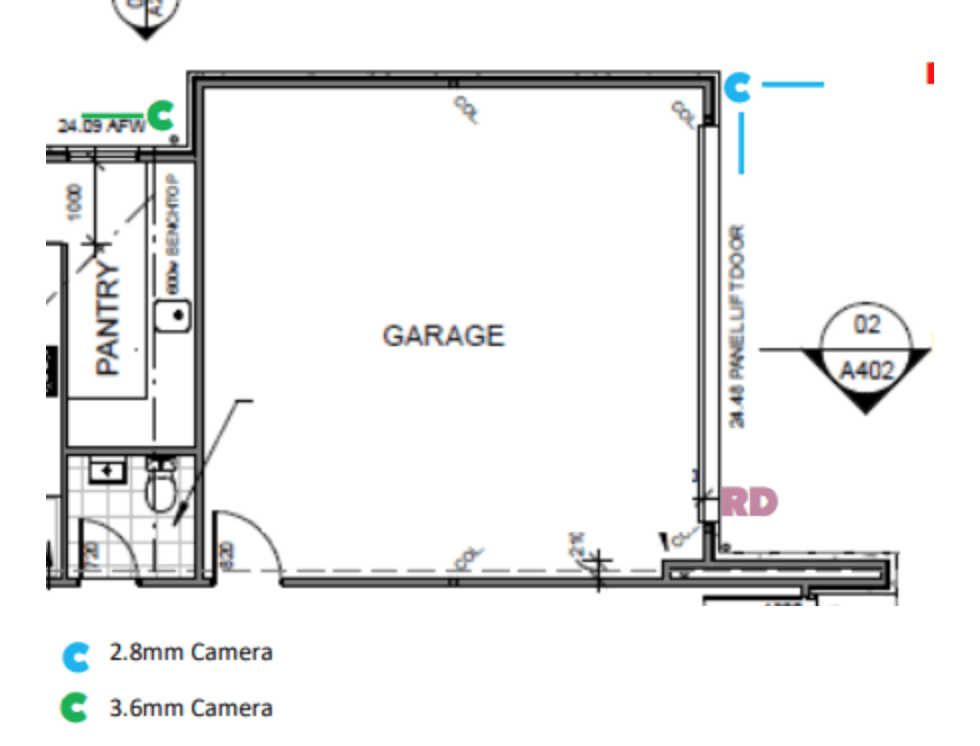
Example of Domestic CCTV Placement
3. Choose the Correct Data Cable
This can either be Cat 5e (the low cost option) or Cat 6 Data cable if you would like to future proof your installation. Cat 5e supports speeds up to 1000 Mbs which is more than acceptable for a domestic security install, however Cat 6 is 10 times faster than Cat 5E and less susceptible to interference.
Alarm
Select a location for your control panel, this will be the point where all cables for the alarm system components are routed to. This location should be: secure/hidden (for example, at the back of a wardrobe), will need access to power power point, and access to an internet connection / data point if you intend to use IP based self monitoring. Once you have chosen the location of your control panel you will need to locate your keypad, external sire, internal screamer, and detection devices. These all need to be wired back to the control panel.
- Select a location for your keypad (this will be installed inside your home), preferably near the main entrance.
- Select location for external siren
- Select location for internal screamer siren (optional)
- Select the location for your detection devices (motion detectors, and reed switches).
*Note: Locating these detection devices requires expertise so we generally recommend that you do not prewire these items, but rather add them wirelessly after your build is complete (see below).
Keep in mind that all alarm components can be added wirelessly if necessary. While we don’t recommend battery powered/wireless CCTV, we do recommend wireless/battery powered alarm components.
Alarm detection devices (PIR motion detectors, reed switches) consume very small amounts of power and you will get up to 5 years battery life on these components. Ideally you will hardwire the keypad and external siren but these can also be added wirelessly if needed.
Additionally, the cable required for alarm components is 4 core 7/14 strand cable. This is thinner and less expensive than the data cable required for CCTV.
Intercom/Video Doorbell
Video intercoms are now IP based and can be integrated into your CCTV system (i.e. continuous recording to your NVR) and operate through a single mobile phone app. To achieve this integration it is important that you prewire for the external door station and internal monitor(s). If also pre-wiring for a CCTV system you simply need to run individual cables from each intercom component back to the location of your NVR.
You can also use intercom systems for access control of doors and gates so you should consider this wiring at the time of installation.
The cable used for the door station and the monitor should be Cat 5e (the cheaper option) or Cat 6 Data cable.
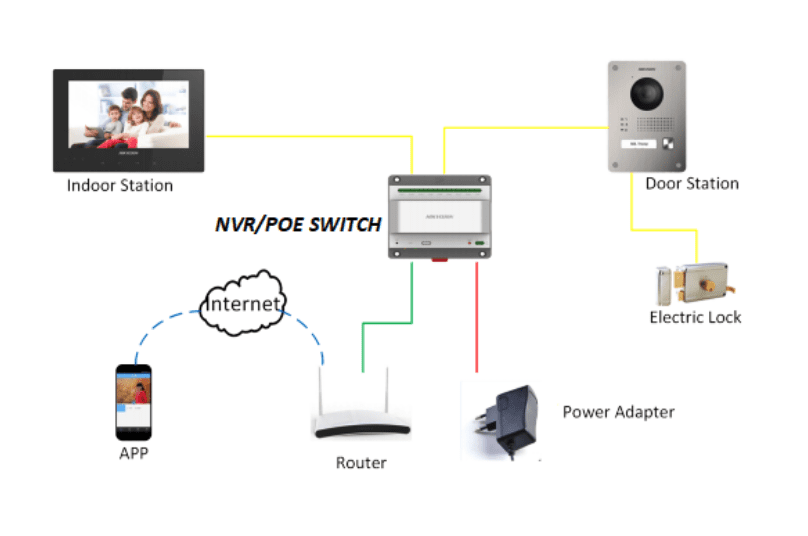
Intercom Wiring Diagram
FAQs Regarding Pre-Wiring
How Much Should a Pre-Wire Cost?
The cost to prewire will depend on your builder and their willingness to accommodate your requests. Many builders will want to sell you the whole security system (not just the prewire) so they may not be supportive of a prewire done by external tradesmen.
As a general rule, allow for at least $150 for each run of data cable (cctv and intercom) and $100 for each run of alarm cable. This cost can vary depending on factors such as the time taken to do the installation and accessibility.
What Should You Do if You Have Missed the Opportunity to Pre-Cable?
You’ve received the keys to your new home, only to realise you’ve forgotten about security! Don’t panic. Jim’s experienced security technicians will still be able to assist you. There are many alternative options and work-arounds to ensure you still receive the ideal solution to protect your home. Contact Jim’s Security today to discuss options for new builds with no provisions for security.
